Estimate
A detailed estimate in construction refers to a comprehensive breakdown of the anticipated costs associated with a construction project. This estimate is a meticulous calculation that itemizes various components, materials, labour, and other expenses required for the successful completion of the project.
The detailed estimate is typically created during the planning and design phase of a project and serves as a fundamental tool for budgeting, tendering, and project management.
Inbox
Home Page > Estimates
To access the estimate inbox, follow these steps:
Step 1: Navigate to the home page.
Step 2: Look for and click on the "Estimates" option. This action navigates you to the estimate inbox, where you can manage and view the estimates.
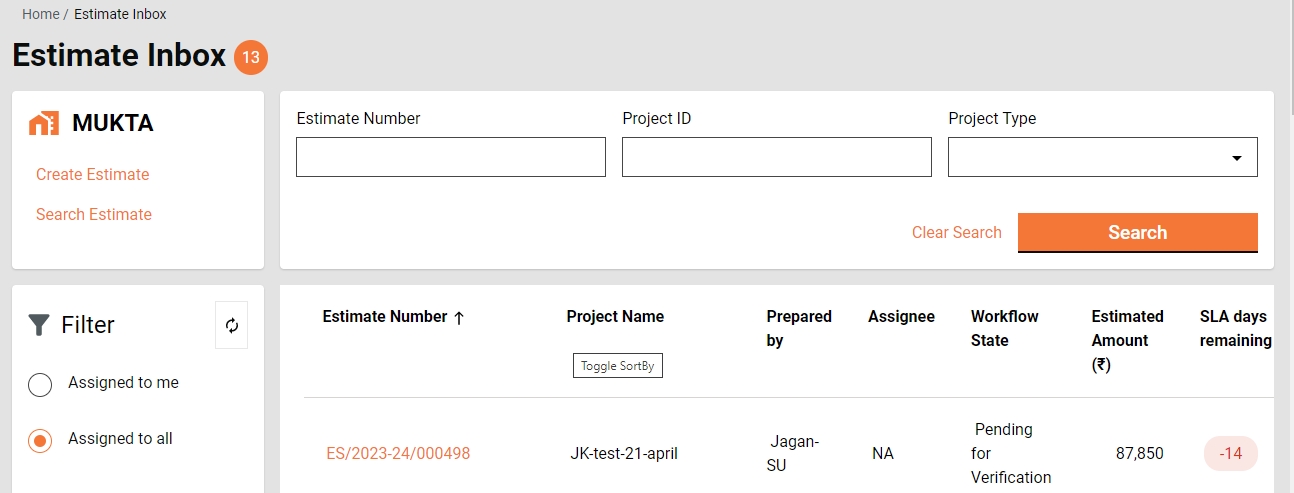
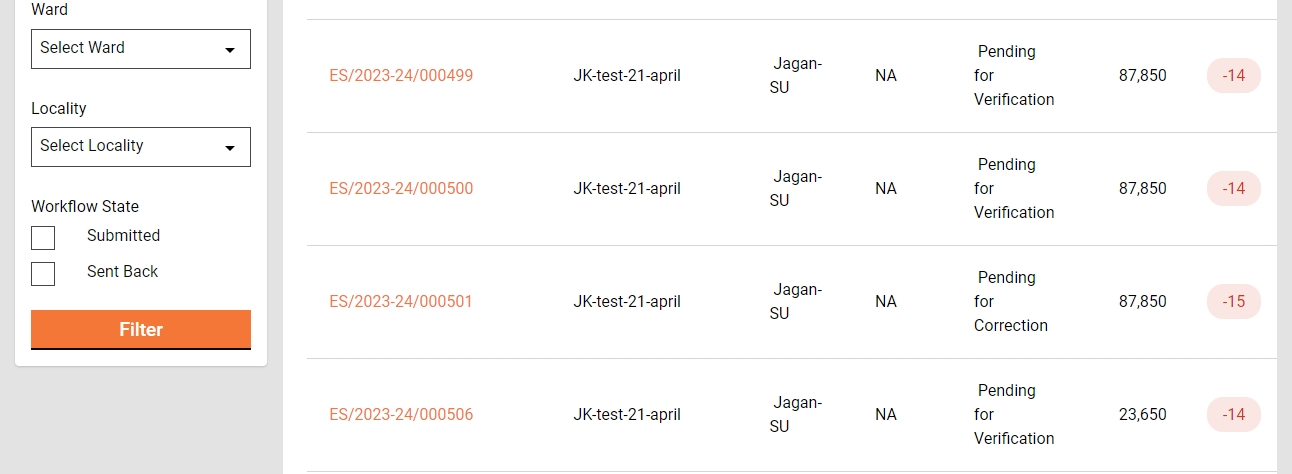
Step 3: Select and apply the filters and search parameters as applicable.
The feature menus are displayed on the top left side.
The bottom panel displays the filters on the left.
Assigned to Me - The only estimates assigned to the logged-in user are displayed on the right side window.
Assigned to All - It is default selected and hence the estimates assigned to anyone are displayed on the right side window.
Ward- It filters the application based on the ward selected and then displays the result on the right side window.
Workflow States - It appears only when the application type filter is selected. It filters the application based on the application status selected and then displays the result on the right side window.
The Search parameters are displayed on the top right. Search the estimate by Estimate Number, Project ID, and Project Type.
Step 4: The window on the bottom right lists the estimates based on the default settings and applied filters and search parameters.
Search Estimate
Home Page > Estimates> Search Estimate
The 'Search Estimate' functionality empowers ULB employees to locate specific estimates with precision by utilizing multiple filters, streamlining the process of retrieving relevant and targeted information.
Search Criteria
Ward
Project Type
Project Name
Estimate Number
Status
From Date
To Date

Step 1: It is mandatory to enter at least one search parameter or more to search for an estimate.
The system fetches the estimates created between the specified period by entering the date range in created from and created to. The From Date and To Date fields are treated as one parameter.
Step 2: Click on the Search button to view the search results.
Step 3: Click on the Clear Search button to renew the search using different parameters.
The Search Result displays the following:
Estimate Number
Project Name
Location
Prepared by
Status
Estimated Amount (₹)
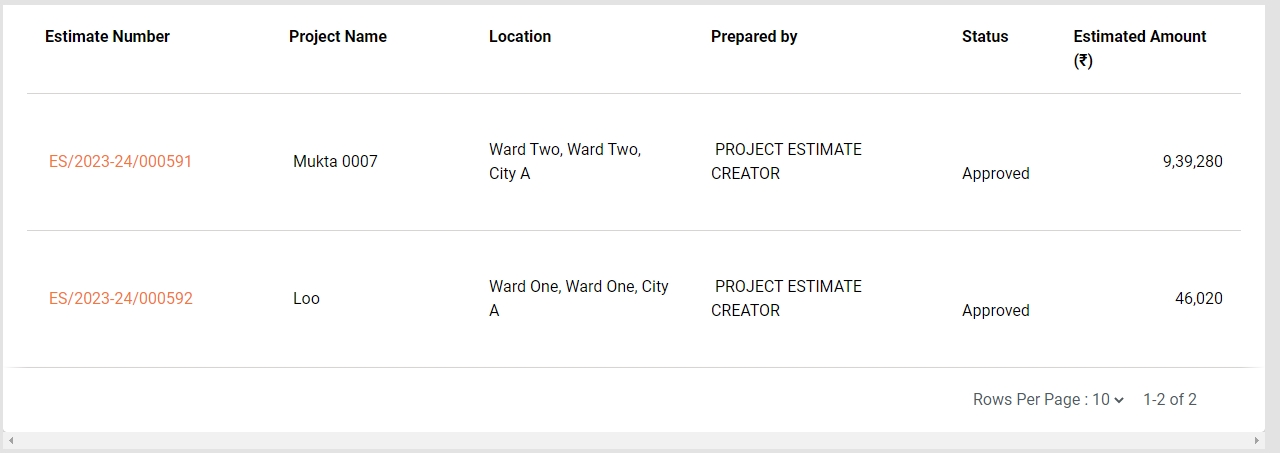
View Estimate
Home Page > Estimates> Inbox > Search Estimate > Search Results
To view the details of a specific estimate
Step 1: Click on the applicable Estimate Number in the search results. This action displays information and specifics associated with the selected estimate.


Create Estimate
Home Page > Estimates > Inbox > Create Estimate
To create an estimate for a project
Step 1: Click on the search project feature to locate the desired project.
Step 2: Click on the applicable Project ID from the search results list to view the project details.
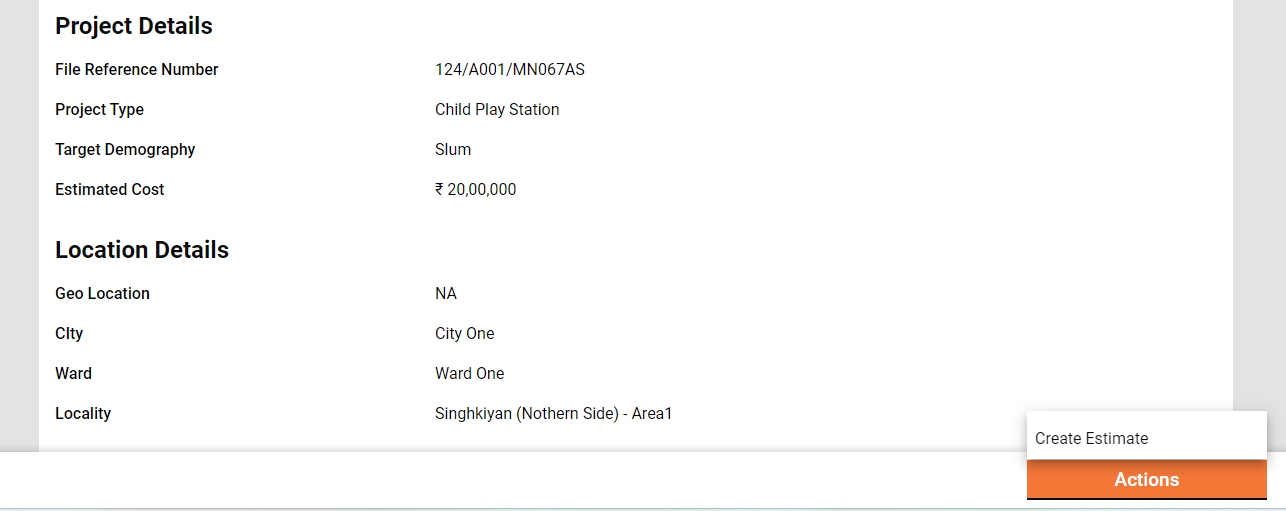
Step 3: Navigate to the Actions button located in the bottom right corner and click on the Create Estimate option.

Step 4: The basic project details are available at the top of the page. The Project Details tab provides a comprehensive view of the full project details.
Step 5: Click on the Estimate Details tab. Enter the SOR details. Estimate details are organized into grids for Schedule of Rates (SOR), Non-SOR items, and Other Charges.

Step 7: Use the Search option to find the relevant Schedule of Rates (SOR) and add the SOR items to the estimate.


Step 8: For Non-SOR items, enter the item Description, Unit, Rate, and Estimated Quantity details.
Step 9: Click on the Add Non-SOR button to append additional Non-SOR items to the estimate.

Step 10: Select Goods and Services Tax (GST) and Supervision Charges from the Overhead dropdown in the Other Charges section to add these details to the estimate.

Step 11: The total of SOR, Non-SOR and Other Charges is displayed as the Total Estimate Amount.
Step 12: Click on the View Analysis Statements option to view the breakdown of labour, material, and machinery costs for the estimated amount.
Step 13: Upload the documents in the Relevant Documents section required to verify and approve the estimate.

Step 14: Follow the steps below to save and create the estimate -
Save as Draft:
Click on the Save as Draft button to save the entered details without finalizing the estimate. This allows for further editing and review before submission.
Submit:
Once all details are filled in and the estimate is ready for submission, click on the Submit button.
Ensure that all fields marked with an asterisk (*) are completed, as these are mandatory fields.
Role Workflows
The role-based workflows detail the actions available for individual roles. Click on the applicable role to navigate the workflows.
Estimate Creator
The Estimate Creator (EC) is responsible for creating and forwarding the estimation along with relevant documents uploaded.
EC can
Save as Draft
The "Save as Draft" feature provides users with the capability to create an estimate and retain it in the creator's inbox for subsequent updates. This functionality allows users to initiate the estimate creation process, save the work in progress as a draft, and revisit it later for additional edits or finalization before submission.
Submit
The Estimate Creator (EC) can create and submit an estimate for a project. The estimate is forwarded to the verifier.
Step 1: Click on the Submit button once the estimate details are entered.
Step 2: The EC gets the forward dialogue box. Select the verifier name as the Assignee Name and add Comments if any.
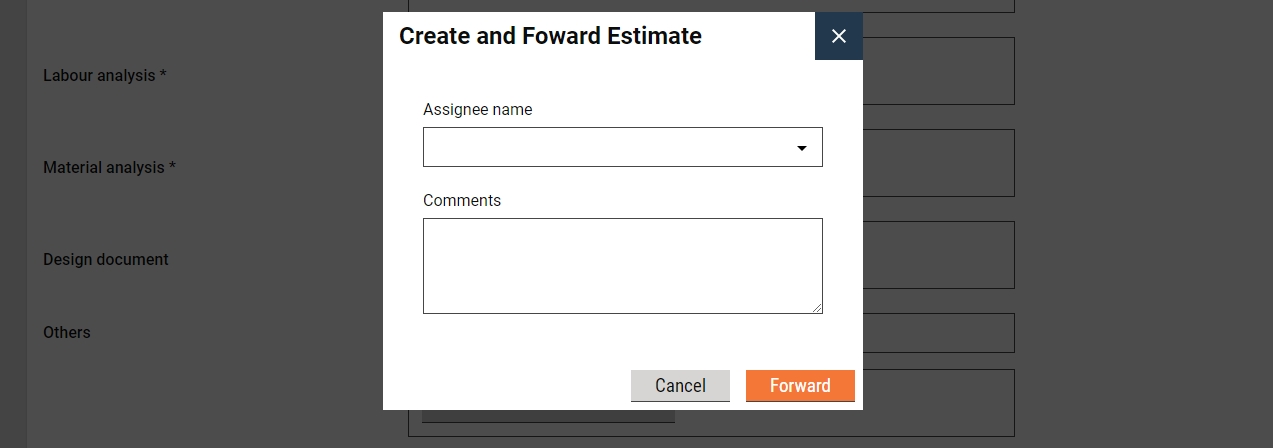
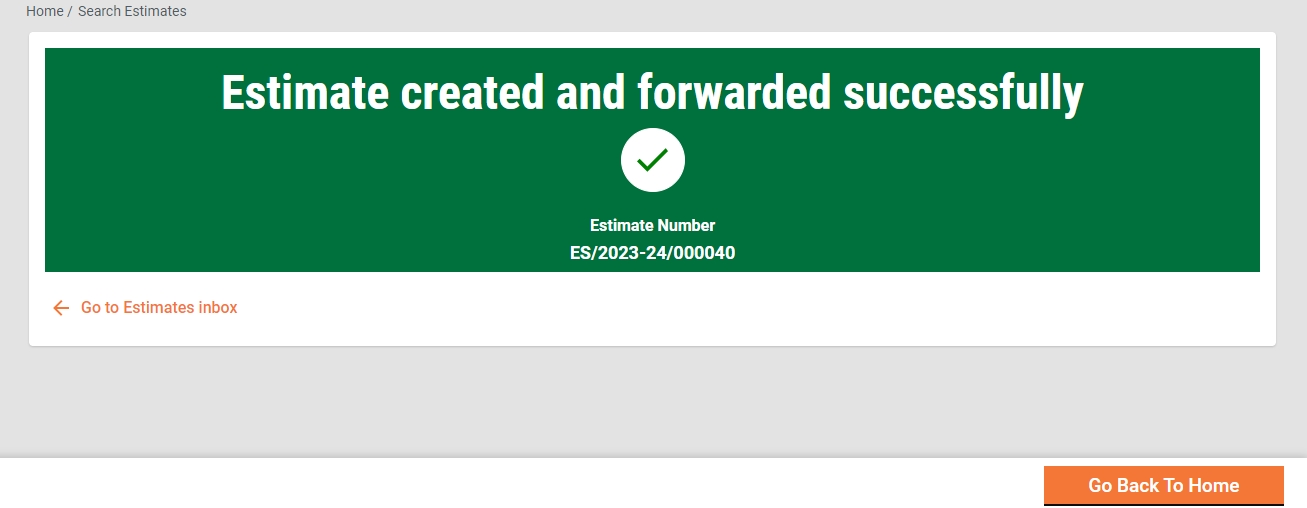
Step 3: Click on the Forward button. The estimate is forwarded to the selected Assignee for verification. A success message is displayed with the Estimate Number.
Edit
The estimate creator (EC) has the right to edit the estimate in case the estimate is sent back for any correction.
Step 1: Click on Estimate Number of the estimate pending correction. This is available in the Inbox. Else, click on the Search Estimate option to search for the estimate.
Step 2: Click on the Take Action button and select Edit. The estimate is opened in editable mode.
Step 3: Edit the required details. Click on Submit once editing is complete. The submitted estimate is again sent to the verifier for verification.
Estimate Verifier
The Estimate Verifier (EV) is responsible for verifying the estimation and supporting documents uploaded.
EV can
Verify and forward
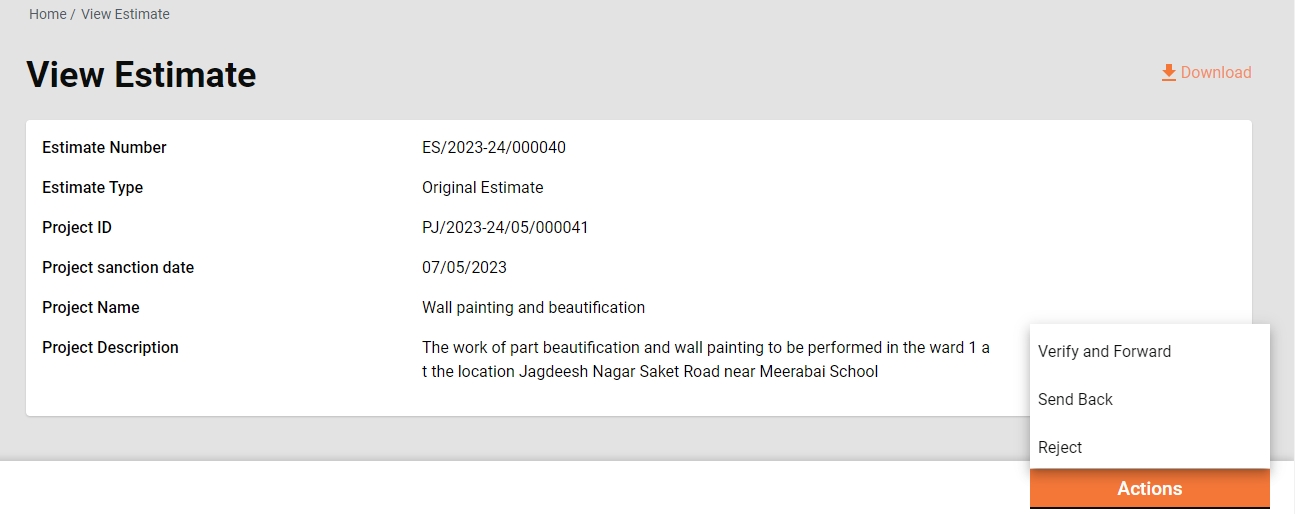
The EV verifies and forwards the application if the documents and estimation provided in the estimate are found satisfactory and complete.
To verify and forward the estimate
Step 1: The estimate pending verification is available in the Inbox. Else, search for the estimate using the search estimate.
Step 2: Click on the Estimate Number to open the estimate and view the details.
Step 3: Select the Verify and Forward from the Take Action. This opens a pop-up window.
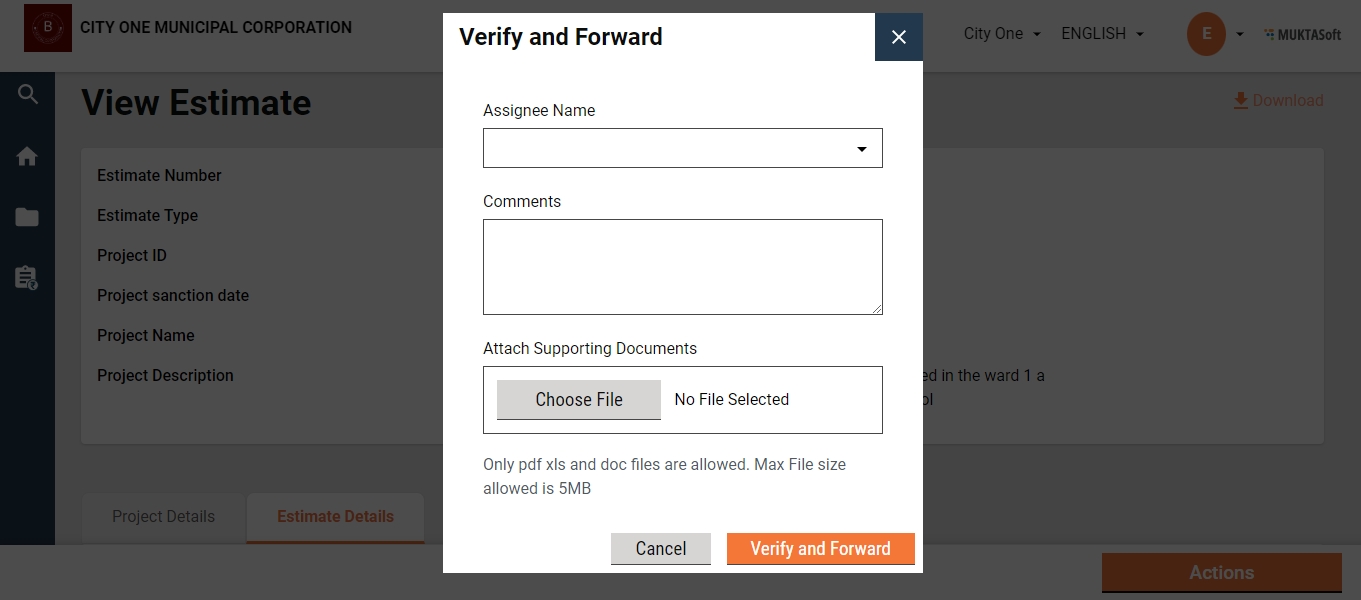
Step 4: Select the technical sanctioner’s name as Assignee Name.
Step 5: Enter any additional information for the assignee in the Comments box.
Step 6: Click on the Choose Files button to upload any supporting documents.
Step 7: Click on the Verify and Forward button. The application is forwarded to the technical sanctioner.
Send back
EV can send the estimate back to the EC for any corrections or if any vital document has not been uploaded.
To send the estimate back to the CE
Step 1: The estimate pending verification is available in the Inbox. Else, search for the estimate using the search estimate.
Step 2: Click on the Estimate Number to open the estimate and view the details.
Step 3: Select the Send Back from the Take Action. This opens a pop-up window.
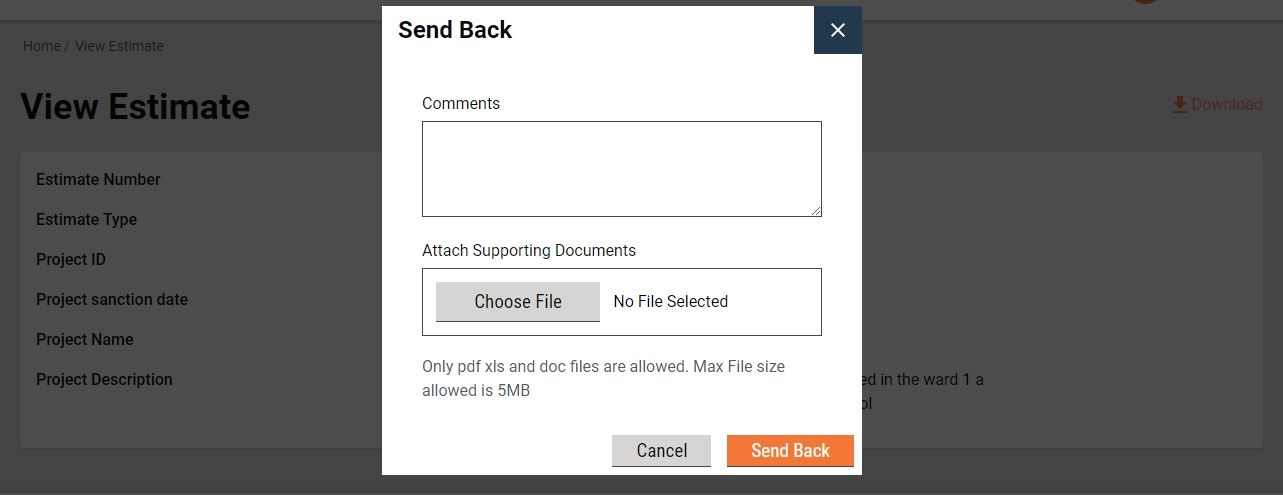
Step 4: State the reasons for sending the estimate back to the CE in the Comments box.
Step 5: Click on the Choose Files button to upload any supporting documents.
Step 6: Click on the Send Back button. The estimate is placed into CE’s inbox and enabled for editing.
Technical Sanctioner
The Technical Sanctioner (TS) is responsible for technically sanctioning the estimate.
TS can
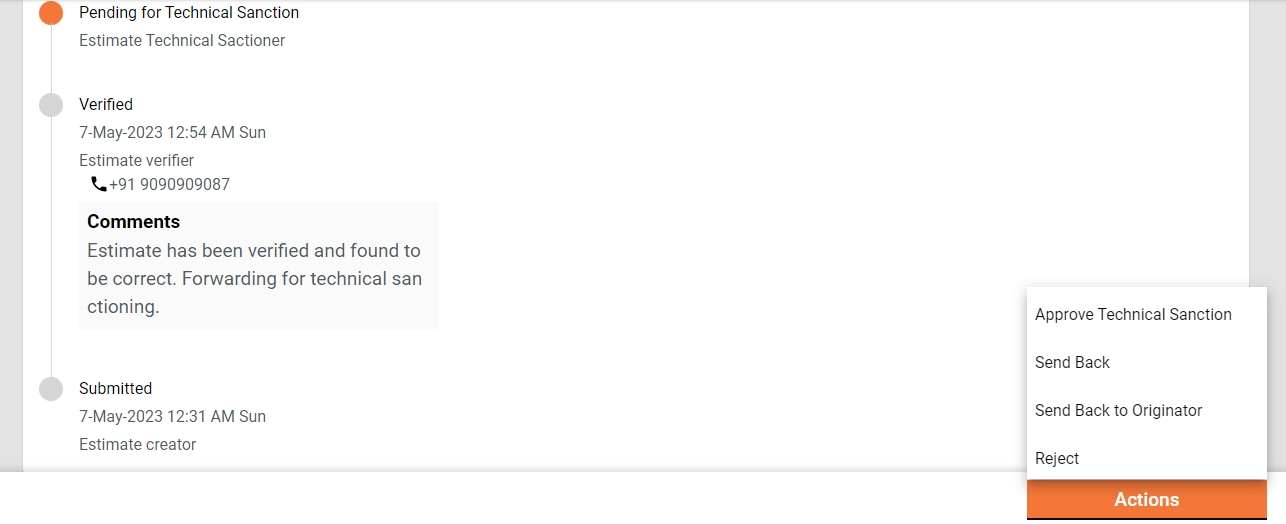
Technical Sanction
The TS technically approves the estimate if the estimate is found technically correct.
To technically sanction the estimate
The estimate pending verification is available in the Inbox. Else, search for the estimate using the search estimate.
Click on the estimate number to open the estimate and view the details.
Select the Send Back from the Take Action. A pop-up window is opened.
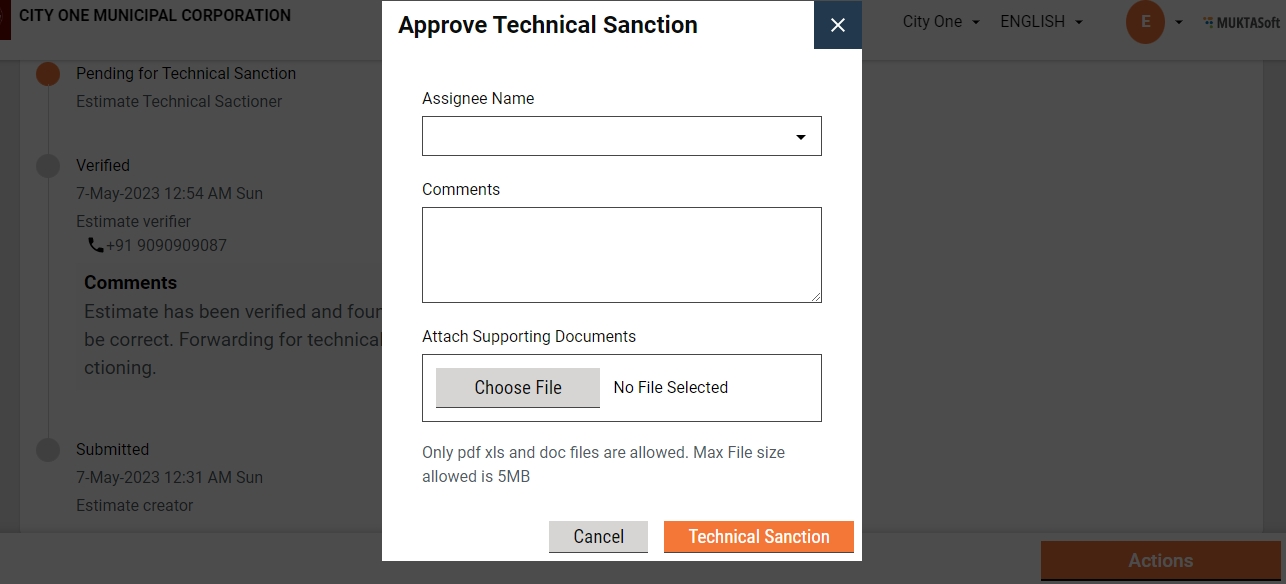
Select the estimate’s approver’s name as Assignee Name.
Provide any additional information for the assignee in the comments section.
Click on the Choose Files button to upload any supporting documents.
Click on the Technically Sanction button. The application is forwarded to the estimate approver.
Send Back
TS can send the estimate back to the EV for any clarification which is needed by TS to proceed further.
To send the estimate back to the EV
The estimate pending for technical sanction is available in the Inbox. Else, search for the estimate using the search estimate.
Click on the estimate number to open the estimate and view the details.
Select the Send Back from the Take Action. A pop-up window is opened.
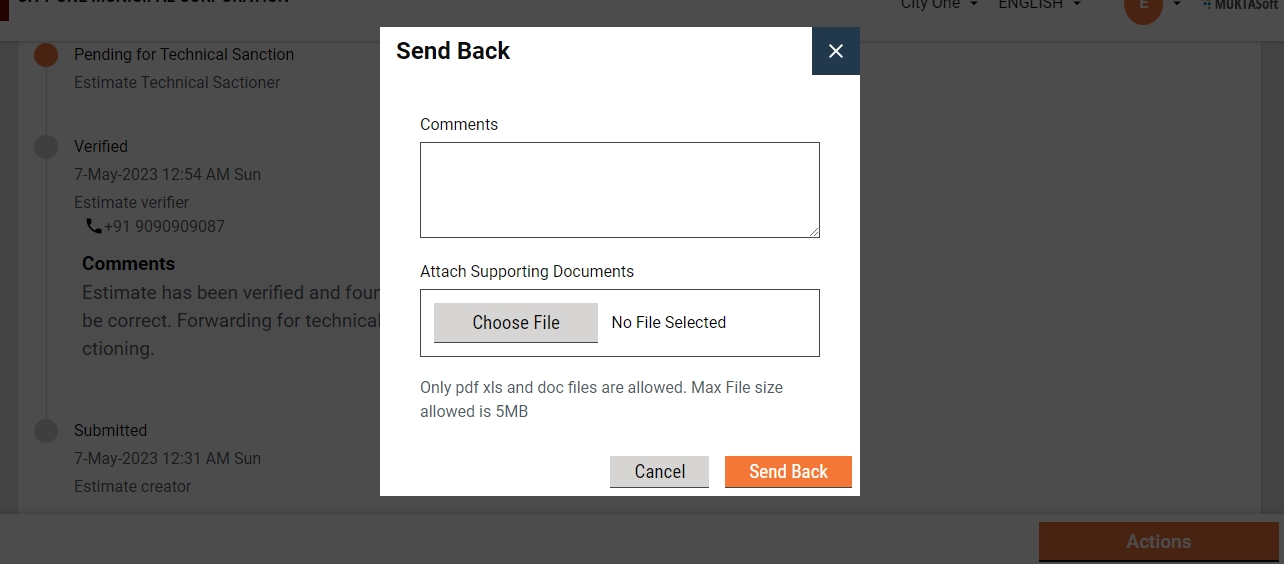
State the reasons for sending the estimate back to the EV in the comments section.
Click on the Choose Files button to upload any supporting documents.
Click on the Send Back button. The estimate is placed into EV’s inbox.
Send back to originator
TS can send the estimate back to the EC for any corrections or if any vital document has not been uploaded.
To send the estimate back to the CE
The estimate pending for technical sanction is available in the Inbox. Else, search for the estimate using the search estimate.
Click on the estimate number to open the estimate and view the details.
Select the Send Back from the Take Action. A pop-up window is opened.
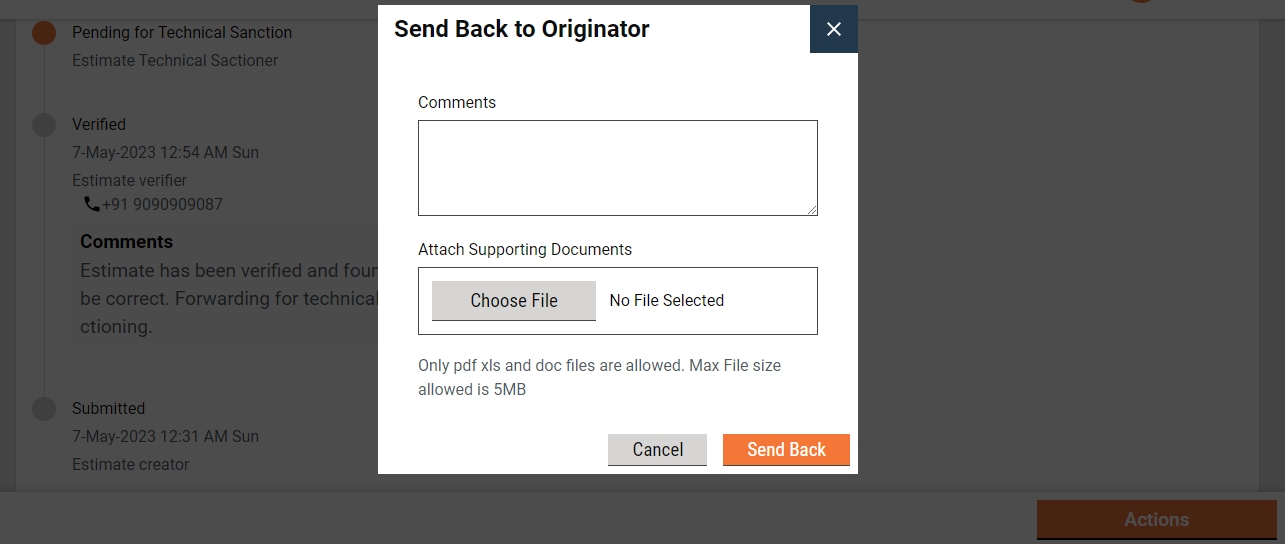
State the reasons for sending the estimate back to the CE in the comments section.
Click on the Choose Files button to upload any supporting documents.
Click on the Send Back button. The estimate is placed into CE’s inbox and the estimate is enabled for editing.
Reject
The TS can reject the estimate if the documents and information furnished by the EC do not meet the prescribed guidelines.
To reject the estimate
The estimate Pending for Technical Sanction is available in the Inbox. Else, search for the estimate using the search estimate.
Click on the estimate number to open the estimate and view the details.
Select the Reject from the Take Action. A pop-up window is opened.
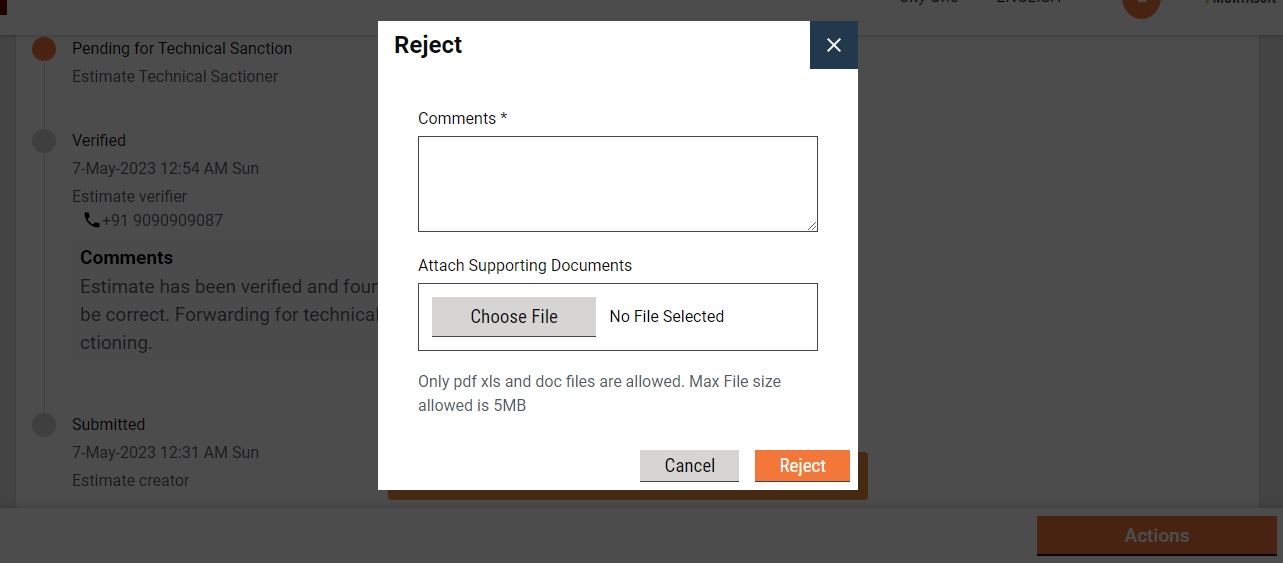
State the reasons for rejecting the estimate in the Comments section.
Click on the Choose Files button to upload any supporting documents.
Click on the Reject button. The estimate is rejected, and a notification is sent to the EC informing the same.
Approver
The Approver verifies the estimate and if the documents and estimation provided in the application are found satisfactory, complete and the estimation amount as per the guideline, the estimate is approved.
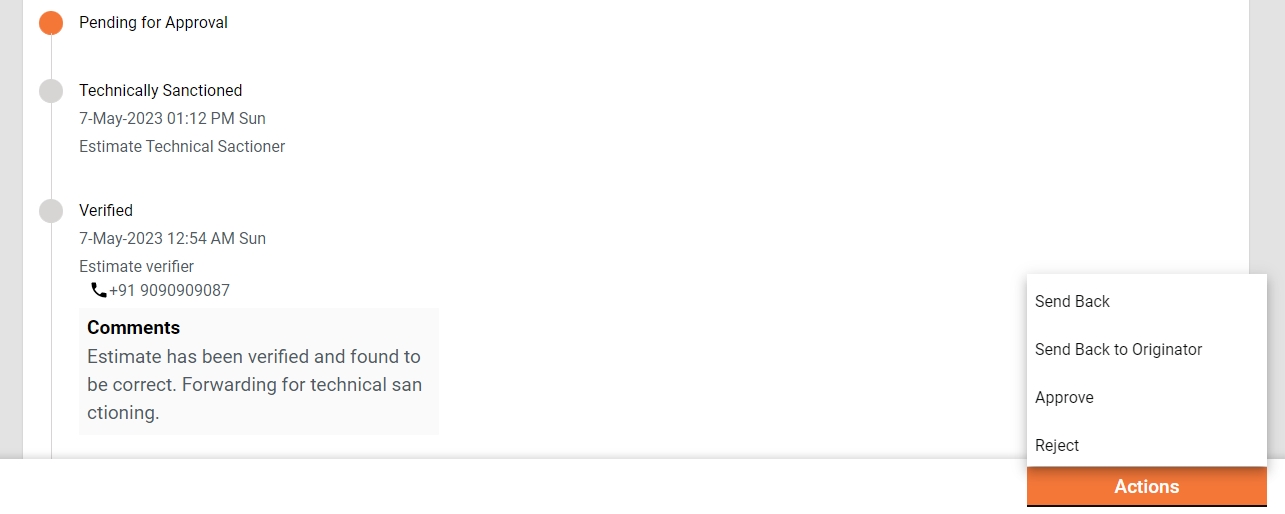
Approver can
Approve the estimate
Send the estimate back to TS
Send the estimate back to EC
Reject the estimate
Approve
The estimate Pending Approval is available in the Inbox. Else, search for the estimate using the search estimate.
Click on the estimate number to open the estimate and view the details.
Select the Approve from the Take Action. A pop-up window is opened.
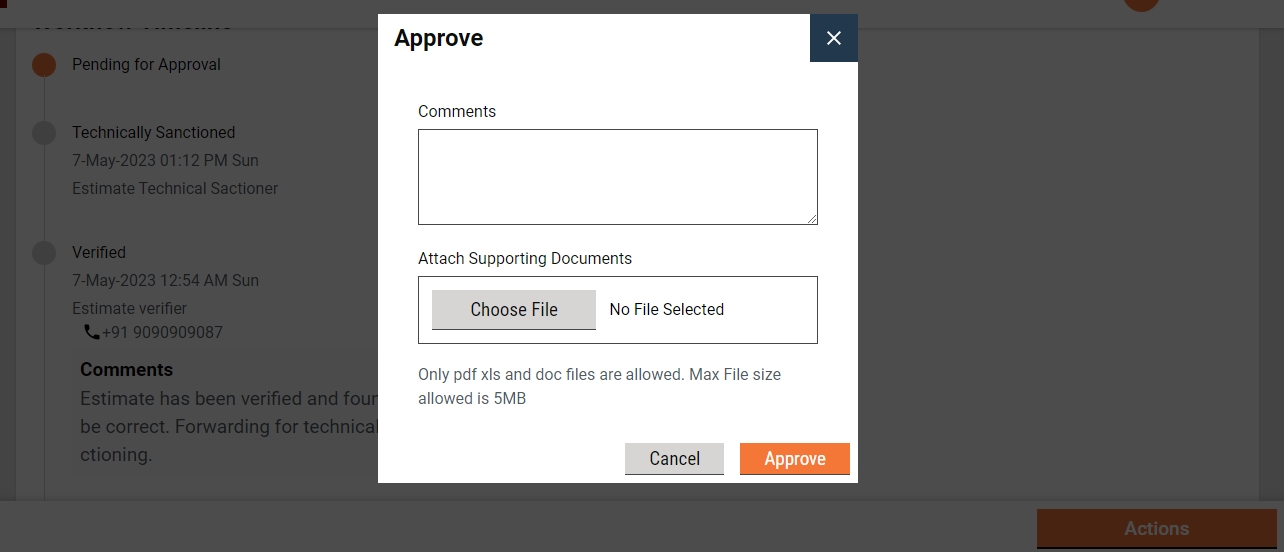
Provide any additional information for the applicant in the Comments section.
Click on the Approve Files button to upload any supporting documents.
Click on the Approve button. The estimate is approved.
Send Back
To send the estimate back to the TS
The estimate pending approval is available in the Inbox. Else, search for the estimate using the search estimate.
Click on the estimate number to open the estimate and view the details.
Select the Send Back from the Take Action. A pop-up window is opened.
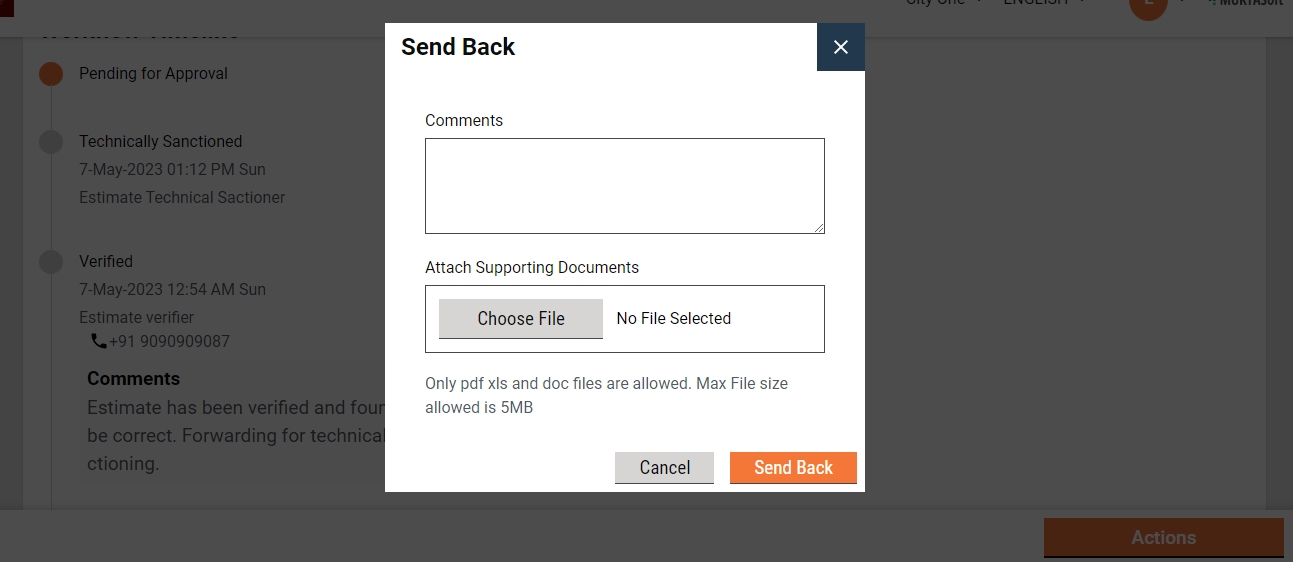
State the reasons for sending the estimate back to the TS in the comments section.
Click on the Choose Files button to upload any supporting documents.
Click on the Send Back button. The estimate is placed into TS’s inbox.
Send back to originator
To send the estimate back to the CE
The estimate pending for technical sanction is available in the Inbox. Else, search for the estimate using the search estimate.
Click on the estimate number to open the estimate and view the details.
Select the Send Back from the Take Action. A pop-up window is opened.
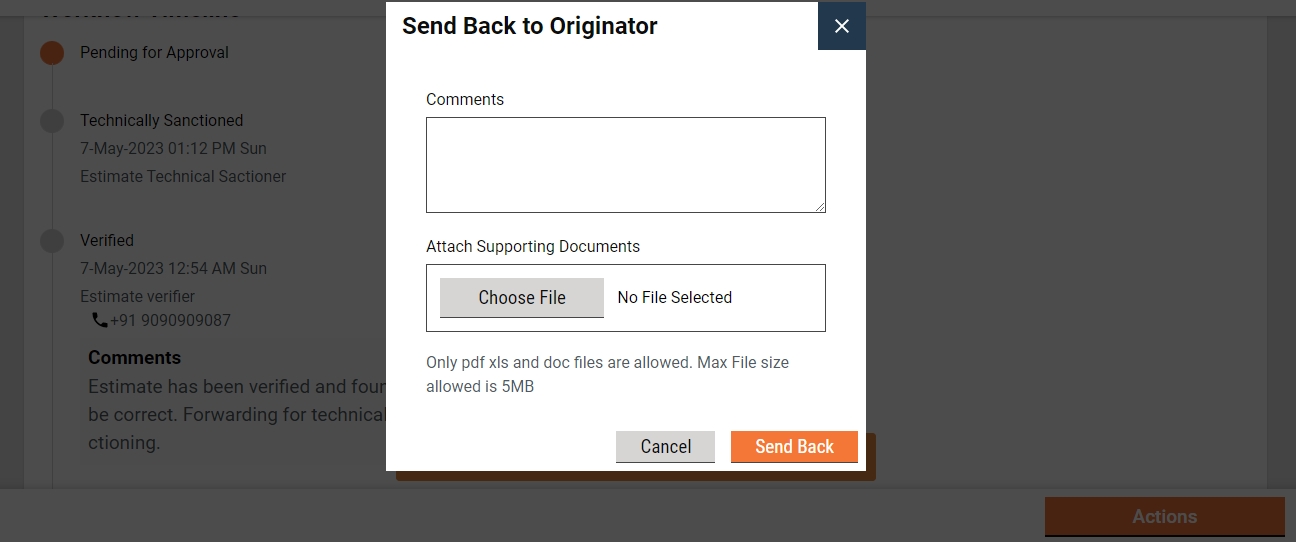
State the reasons for sending the estimate back to the CE in the comments section.
Click on the Choose Files button to upload any supporting documents.
Click on the Send Back button. The estimate is placed into CE’s inbox and the estimate is enabled for editing.
Reject
The Approver can reject the estimate if the documents and information furnished by the EC do not meet the prescribed guidelines.
To reject the application
The estimate Pending Approval is available in the Inbox. Else, search for the estimate using the search estimate.
Click on the estimate number to open the estimate and view the details.
Select the Edit from the Take Action. A pop-up window is opened.
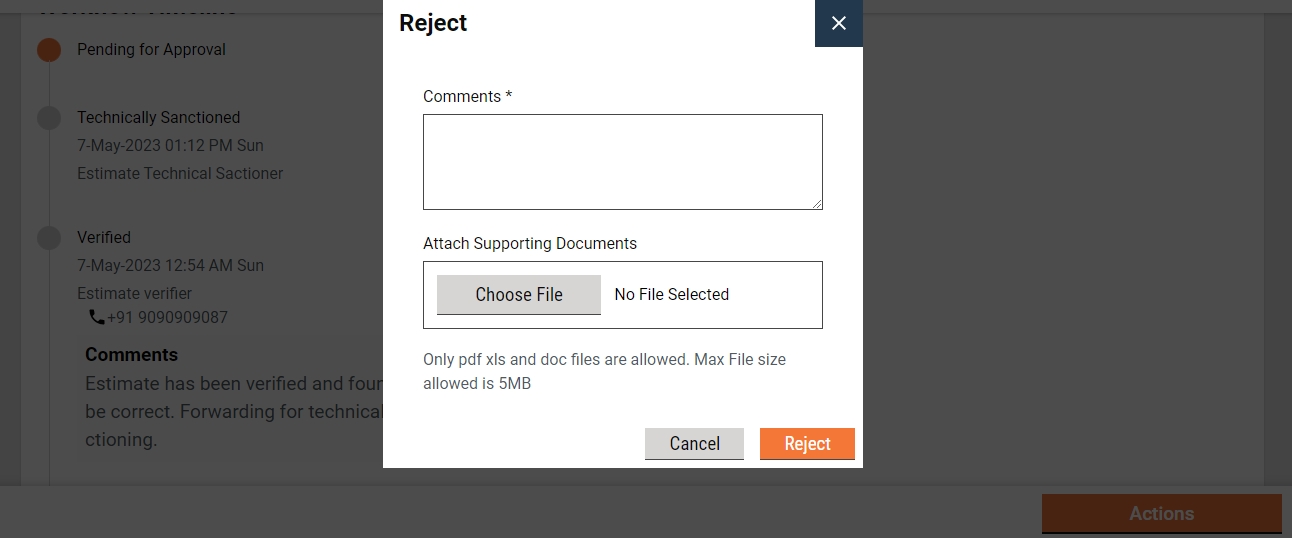
State the reasons for rejecting the estimate in the Comments section.
Click on the Choose Files button to upload any supporting documents.
Click on the Reject button. The estimate is rejected and a notification is sent to the EC informing the same.
Last updated
Was this helpful?